Address Tables
Code often contains tables of addresses to code or data. Formatting them one at a time can be tedious, so SourceGen provides a faster way. For this tutorial we'll start by labeling and tagging a single entry by hand, then do the rest in one shot.
Start a new project. Select the Apple //e platform, click Select File and navigate to the 6502bench Examples directory. In the "A2-Amper-fdraw" directory, select the file "AMPERFDRAW#061d60" (just ignore the existing .dis65 file). Click OK to create the project. Click Cancel to skip saving the project file.
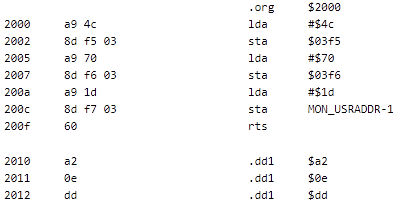
Not a lot to see here -- just half a dozen lines of loads and stores, then nothing but data. This particular program interfaces with Applesoft BASIC, so we can make it a bit more meaningful by loading an additional platform symbol file.
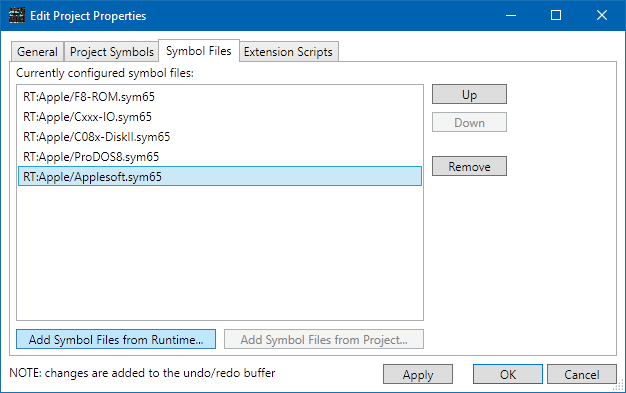
Select Edit > Project Properties, then the Symbol Files tab. Click Add Symbol Files from Runtime. The file browser starts in the "RuntimeData" directory. Open the "Apple" folder, then select "Applesoft.sym65", and click Open. Click OK to close the project properties window.
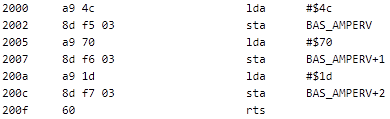
The STA instructions now reference BAS_AMPERV,
which is noted as a code vector. We can see the code setting up a jump
(opcode $4C) to $1D70.
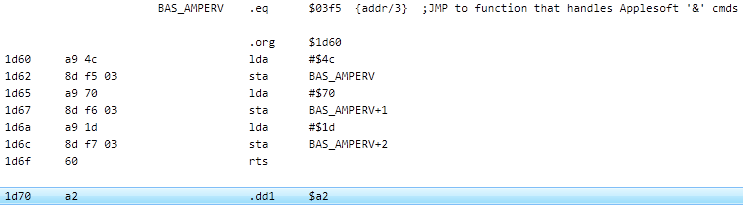
As it happens, the start address of the code
is $1D60 -- the last four digits of the filename -- so let's make that
change. Double-click the initial .ADDRS statement,
and change it from $2000 to $1D60. We can now see that $1D70 starts
right after this initial chunk of code.
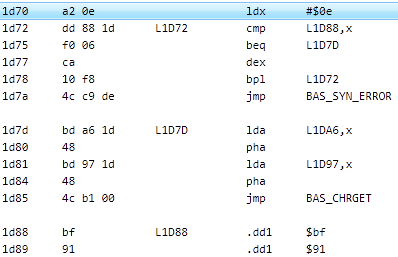
Select the line with address $1D70, then Actions > Tag Address As Code Start Point. More code appears, but not much -- if you scroll down you'll see that most of the file is still data.
The code at $1D70 searches through a table at
$1D88 for a match with the contents of the accumulator. If it finds a match,
it loads bytes from tables at $1DA6 and $1D97, pushes them on the stack,
and then JMPs away. This code is pushing a return address onto the stack.
When the code at BAS_CHRGET returns, it'll return to that
address. Because of a quirk of the 6502 architecture, the address pushed
must be the desired address minus one.
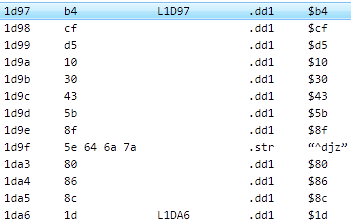
The first byte in the first address table at $1D97 (which
has the auto-label L1D97) is $B4.
The first byte in the second table is $1D. So the first
address we want is $1DB4 + 1 = $1DB5.
Select the line at $1DB5, and use Actions > Tag Address As Code Start Point. More code appears, but again it's only a few lines. Let's dress this one up a bit. Set a label on the code at $1DB5 called "FUNC". Then, at $1D97, edit the data item (double-click on "$B4"), click Single bytes, then type "FUNC" (note the text field gets focus immediately, and the radio button automatically switches to symbolic reference when you start typing). Click OK.
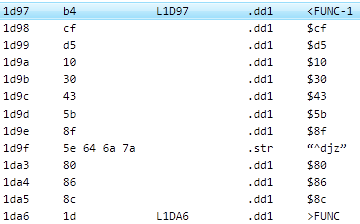
The operand at $1D97 should now say <FUNC-1.
Repeat the process at $1DA6, this time clicking the High
part radio button below the symbol entry text box,
to make the operand there say >FUNC. (If it says
<FUNC-152, you forgot to select the high part.)
We've now changed the first entry in the address table to a symbolic reference, which will help someone reading the code to understand what is being referenced. You could repeat these steps (tag as code, set label, change address bytes to symbols) for the remaining items, but there's an easier way.
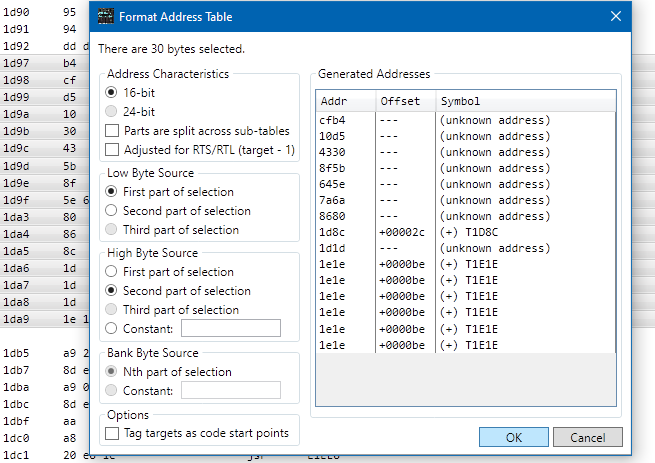
Click on the line at address $1D97, then shift-click the line at
address $1DA9 (which should be .FILL 12,$1e). Select
Actions > Format Address Table.
Contrary to first impressions, this imposing dialog does not allow you to launch objects into orbit. There are a variety of common ways to structure an address table, all of which are handled here. You can configure the various parameters and see the effects as you make each change.
The message at the top should indicate that there are 30 bytes
selected. In Address Characteristics, click the
Parts are split across sub-tables checkbox and the
Adjusted for RTS/RTL checkbox.
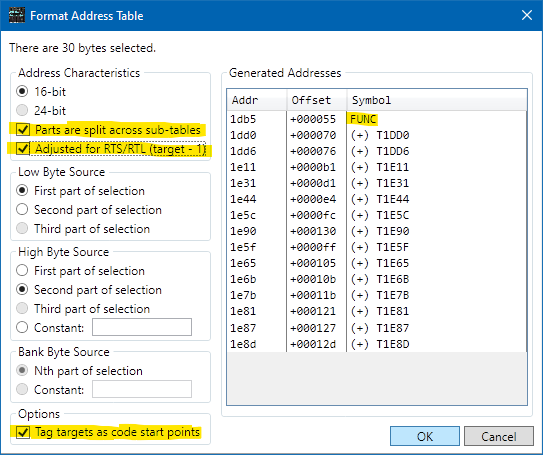
As soon as you do, the first line of the Generated Addresses
list should show the symbol "FUNC".
The rest of the addresses will look like
"(+) T1DD0". The "(+)" means that a label was not found at
that location, so a new global label will be generated automatically.
Down near the bottom, check the
Tag targets as code start points checkbox.
Because we saw the table contents being pushed onto the stack for
RTS, we know that they're all code entry points.
Click OK.
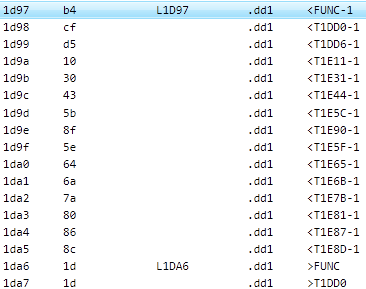
The table of address bytes at $1D97 should now all be references to symbols -- 15 low parts followed by 15 high parts. If you scroll down, you should see nothing but instructions until you get to the last dozen bytes at the end of the file. (If this isn't the case, use Edit > Undo, then work through the steps again.)
The formatter did the same series of actions you went through earlier, but applied them to multiple locations in one shot. The next step in the disassembly process would be to rename the "Tnnnn" labels to something more meaningful. An easy way to do this is to select one of the lines in the table and use Actions > Edit Operand Target Label. For example, if you do this on line $1D97, you will edit the FUNC label.
We don't want to save this project, so select File > Close. When SourceGen asks for confirmation, click Discard & Continue.